Red TWI photo twitterredcheckcirclesocialmediaicon32_zpsb8255daf.png Red FLI photo flickrredcheckcirclesocialmediaicon32_zps0df7798e.png Red PIN photo pinterestredcheckcirclesocialmediaicon32_zpse27bf233.png RED FB photo Facebookredcheckcirclesocialmediaicon32_zps11f2eab3.png

Thursday, January 31, 2013

Eggless Chocolate Chip Cookies


DSC_0737
This was on my to do list for a long time. I remember I had bookmarked it on a lazy afternoon after Raji of Raks Kitchen had posted the recipe and gorgeous pics, months ago before I started this blog.
When I noticed that the Tried and Tasted event hosted by Nivedhanam this month is from Raks Kitchen, I knew I had to finally get it done. I baked these jumbo cookies on Friday anticipating some snack attacks over the weekend. They were crisp and light.
DSC_0734
DSC_0726 DSC_0743 (2)
I will just leave you with a link and not post the recipe here because I stuck to the recipe mentioned by Raji on her blog. The only thing I changed was the quantity of the butter. Since the recipe calls for butter in measurement of cups, I melted the butter and hence ended up using about a tbsp more of it to get the dough to the correct consistency.
Oh.. and I did go overboard with the chocolate chips..but then who doesnt..?

Linking this entry to Tried and tasted event hosted by Sowmya of Nivedhanams.


Monday, January 28, 2013

Easy Colourful Pasta Bake with Mascarpone cheese


pasta bake 7

Pasta is my answer to busy days when I cant spend much time in the kitchen. It is a relief because I know it always go down well with everyone. It comes to rescue while eating out esp. here in Europe where vegetarian food can be difficult to find at times. It is also my number one choice to eat in an Italian restaurant followed by pizza !

 pasta bake 2  Pasta bake 1

Also it freezes well, so it is easy to make ahead. It has at times rescued us in the early days of exhausting parenting of a newborn.
Today I share here an easy pasta bake recipe which uses mascarpone cheese as the base. I usually use cream, milk, butter, flour to form the sauce as the base for pasta bakes just as we do in mac and cheese, but a pasta recipe at a local supermarket using mascarpone caught my eye. Tried it. Liked it.
You can definitely play around with the vegetables, but I ve used peas and corn. Carrots, cauliflower, broccoli are all good choices. Elbow macaroni or penne work well for this dish but I used  since all I had was a little of 2 different types in my pantry I used a combination of both.

pasta bake 3

Easy colourful pasta bake with Mascarpone cheese

Yield Serves 4

500 gms penne or elbow macaroni cooked al dente as per manufacturers instructions
100 gms green peas, fresh or thawed if using frozen
100 gms sweet corn
200 gms mascarpone cheese
50 gms cheddar/gruyere cheese grated
150 ml milk
1 tbsp parsley. Fresh chopped fine or use dried
1/4 tsp chilli powder or paprika. Use more if you like it spicy
salt to taste
1 tsp pepper powdered or crushed
1. Preheat oven to 200 deg Celsius
2. Whisk together mascarpone, milk, parsley, salt, paprika, pepper to form an even mixture.
3. Mix the above mixture with peas, corn and cooked pasta and transfer the contents to an oven proof dish.
3. Sprinkle grated cheese all over the top of the mixture.
4. Bake for 25-30 mins or until golden brown.

Sending this to Pasta Please event hosted by Jacqueline from Tinned Tomatoes this month.


Technorati Tags: ,

Friday, January 25, 2013

Broccoli Tofu stir fried rice

Technorati Tags: ,
broccoli tofu 5

I love one pot meals, especially on weekdays or for those busy days when you just don't have the time to squeeze in an elaborate meal. We love broccoli and tofu, even more so. But when it comes to rice, my 3 year old he is not keen. So this stir fried rice is a good way to lure him into eating rice.
Broccoli tofu 1 cooking stuff 008
broccoli tofu 4 broccoli tofu 6

Broccoli Tofu stir fried rice

Yield – Serves 4

1 medium head of broccoli, cleaned and cut as long stem florets
200 gms firm tofu cut into slices or triangles around 1 inch wide
1.5 cups or 200 gms basmati rice or long grained rice washed, soaked in cold water for 15 minutes, cooked with half teaspoon of salt
2 tbsp sesame oil
4 tbsp soy sauce
1 tsp brown sugar
4 cloves of garlic minced
1 tsp grated ginger
salt as per taste
1 tsp chilli flakes or chilli sauce. This makes it just moderately spicy. Use more if you like it more spicy.
2 - 3 tbsp vegetable oil for frying tofu

For the tofu marinade
1 tbsp sesame oil
1 tsp pepper powdered or crushed
a pinch of salt

Method

1. Cook the broccoli florets in enough hot water for 10 minutes until just done. Do not overcook, so that they remain crunchy. Drain the water and give the broccoli a good wash in cold water. This helps them retain the lovely green color.
2. Mix  the mariande ingredients together and marinate the tofu pieces. Chill in fridge for minimum 2 hours.
3. Shallow fry the tofu slices and drain excess oil with tissue. Keep aside.
4. Mix 1 tbsp sesame oil, soy sauce, sugar in a bowl.
5. Heat 1 tbsp sesame oil in a wok or pan on high heat. Once the oil is hot and you the fumes rising, add the broccoli and stir for 1 or 2 minutes.
6. Add the fried tofu and the oil, soy sauce, sugar mixture and mix well.
7. Immediately add the cooked rice and blend well.
8. Add the chilli flakes and remove from heat.

Serve immediately. Enjoy with a warm bowl of soup.

I am sending this entry to VeggieNook for Vegan Fridays.

the veggie nook  

Saturday, January 19, 2013

Avial

Avial Recipe - Mixed Vegetables in creamy coconut gravy.


Avial is an integral dish of Tamil cuisine. No festivities are complete without it. Hardly an spices involved, yet its simplicity makes it stand out.
Can you believe, that I was completely unaware of this dish until I got married into a tamilian family!?
Its very easy to put together and I usually do make it for casual dinners too.
This is my MILs recipe. I add a bit of ginger to it. You may choose to skip it. Either ways it tastes great.


Avial Recipe - Mixed Vegetables in creamy coconut gravy.

Serves 4

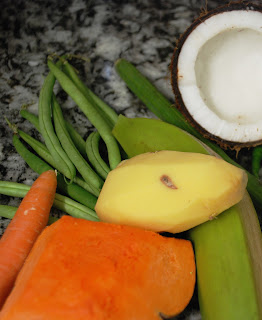
2 Cups Mixed vegetables cut thick. Potatoes, french beans, carrots, drumsticks, pumpkin, yam are the preferred ones
4-5 cups water
1.5 tbsp coconut oil
1/2 tsp turmeric
1/2 cup thick yoghurt
salt as per taste
5-6 curry leaves

to be ground into fine paste

1/2 cup shredded coconut, fresh or thawed
1 green chilli
1 tsp rice
1 tsp jeera

1. Boil the vegetables in water with salt until just done. The vegetables should have a bite to them and should not turn mushy. It took me 10-15 mins on high flame. Note that softer vegetables like pumpkin might need lesser time. So you might want to boil them separately. Drain excess water save 1 cup of stock for later.

2. Grind the ingredients mentioned in ´to be ground into fine paste´ with as much little water as possible.

3. Mix the boiled vegetables with coconut oil, ground paste, turmeric, 1 cup of the stock, salt and curry leaves and cook on medium heat and bring to boil. Do not over boil else the coconut separates out leaving the gravy watery instead of creamy.

4. Remove from heat and add the yoghurt and blend. Serve hot with plain rice.

5. It stays fresh in the fridge for up to a day.

Friday, January 11, 2013

Eggless Vanilla Ice Cream Recipe - Homemade Vanilla Ice Cream Recipe


I am yet to come across someone who doesn't love ice creams. It is usually the ideal dessert for any occasion. Be it birthdays, weddings are a casual dinner party or in my case .. weekend.

Vanilla ice cream, being the most versatile. You could dress it up in numerous ways. Chocolate sauce, caramel sauce, fruit sauce, cookies, fruits .. I could go on and on.

I was tempted to try making it at home. After a bit of research, I decided to try David Lebowitz`s  recipe from his famous book `Perfect Scoop`.  By the way it has a great collection of ice cream and sorbet recipes. The vanilla ice cream recipe calls for egg yolks. Mostly all vanilla ice cream recipes have egg in them. This ensures a richer and creamier texture.
I decided to try an eggless version of it by substituting eggs for custard powder. I tweaked the recipe a bit. Also I dont own an ice cream maker. So to ensure a creamy texture, I had to get the mixture out of the freezer every hour for about 4 times and churn it and put it back again. This is needed to prevent the ice crystals getting formed.

It turned out fabulous! Everyone at my home had second and third servings. It was wiped off in minutes!

Eggless Vanilla Ice Cream Recipe

Adapted from The Perfect Scoop

Yeild: About  1 litre

1 cup (250ml) whole milk
A pinch of salt
3/4 cup (150g) sugar
2 vanilla beans, split lengthwise **
1 cup (250ml) heavy cream or double cream (40-50% fat) *
1 cup (250ml) light cream *
3 tablespoons custard powder
1 teaspoon pure vanilla extract


1. Heat the milk, sugar and salt in a saucepan. Do not boil. Scrape the seeds of the vanilla beans and add it to the milk. Cover and infuse for 1 hour. This is to ensure that the vanilla flavor is absorbed in the milk.
2. Prepare an ice bath with ice cubes and iced water in a large tray or shallow dish. Keep aside.
3. Add the custard powder to the milk vanilla mixture and heat on medium/low flame stirring continuously. Ensure no lumps are formed. Do this till the mixture turns slightly thick or it coats the back of a spoon.
4. Place the pan with the custard mixture in the ice bath. Take care that no water spills into the custard mixture. This is the fastest way to cool down the custard mixture.
5. Stir in the light and heavy cream into the custard mixture until well blended.
6. Add the vanilla extract and blend. Do not over mix.
7. Once mixture cools down. Takes about 10-15 minutes, Place the mixture in a freezer friendly box or container and freeze for an hour.
8. If you do not own an ice cream maker like me an hour later, churn the mixture for about 5 minutes to break down any freezing that might have begun. Do this every hour for 4 to 5 times before freezing for 8 hours or overnight. This breaks down the ice crystals and gives the ice cream a creamy texture. It might seem like a bit of work but believe me it makes a huge difference to the texture.
If you own an ice cream maker, it is surely easier and just freeze as per manufacturers instructions.
9. Take out the ice cream 15 minutes before serving to soften the ice cream a bit and you get a perfect scoop! Enjoy with chocolate or caramel sauce, fruits or crushed cookies. It tastes just as good on its own too.

Notes
* For a less-rich(fewer calories) version, substitute the heavy cream with light cream, realizing that the final texture won’t be as rich or as smooth as if using heavy cream.

** You can subsitute the vanilla bean with pure vanilla extract too. If you do so, you can skip the infusion for 1 hour mentioned in step 1 above.

Sending this to Veg Nation for Kids Delight - Desserts event and Cook like a Celebrity Chef event by Food Corner.

Friday, January 4, 2013

Holiday event and shortbread cookies.

Shortbread Cookies recipe


My sons pre school hosted a Christmas advent event few weeks ago for the kids and we parents.The event was at a forest.
Though the temperatures were freezing we decided to attend as we have to get used to it else we would miss out on things.
Each family was asked to get some sort of finger food. Normally we would have just bought cakes etc from the store for such events.. but since I now have the luxury of time ...well almost which depends of how lil miss P naps, I decided to bake something myself. Shortbread cookies seemed apt as they are pretty quick to make n kids like them. You never know if any of the kids might be allergic to nuts. So I went for no nuts to be on the safer side, else ground almonds are a good choice.


The event was fun and we had a nice time. It wasnt as cold as we had expected. The kids lit candles and sang the candle song they had been praticing at school.
The cookies didn't last long and I was very glad that my son enjoyed them the most!


Shortbread Cookies:

Adapted from here. 

Makes around 40 medium sized cookies.

3 cups (510 grams) plain flour 
a pinch of salt
226 gms unsalted butter at room temp
1 cup 100 g powdered sugar
1 teaspoon vanilla extract

Mix the flour and salt and keep aside.
Beat the butter and sugar until a creamy mixture with a hand blender or spoon. Add vanilla extract and mix.
Now fold in the flour in the butter mixture until a soft but firm dough forms. Refrigerate for an hour or 2.
Roll the dough into a disc or roti of quarter f an inch thick and cut out shapes using cookie cutter of your choice.

Place them a baking sheet and chill in fridge for 15 mins. This helps them retain shape.
Bake at 180 degrees in a preheated oven on middle rack for 15 mins. Cool on rack.
When done the cookies may seem soft but will harden once cool.

Enjoy!